Tuesday 30 May 2017

Tech Tip Tuesdays - App for slideshows

Welcome back to another Tech Tip Tuesday. Click here to view any of the other posts in this series. As always, if there are any technology tutorials that you'd like me to feature, be sure to comment below!

This week's post is an app I've recently discovered for making slideshows of pictures and/or video clips. It's called Quik (by GoPro) and it's available for free on iOs and Android. It's so quick and easy to use and the results look really cool. You can select from one of the many templates that already has layouts, filters, music and different text/picture transitions, or you can create your own style. 

So if you've got a school event coming up or you'd like to put it together for the end of the school year, get on it!


Credits for Tech Tip Tuesday logo:
Keyboard lettering  licensed by Dancing Crayon Designs ©www.dancingcrayon.com 
Glittery clip art from Glitter Meets Glue Designs 

Clip art frame from My Cute Graphics

Sunday 28 May 2017

IB MYP complete poster pack

Hi all,

I've been busy putting together a bumper pack of all of my IB MYP poster sets.


This 80-page IB MYP poster pack contains the following:

  • 8 curriculum subjects posters (and heading)
  • Approaches to Learning skills display on cogs
  • 12 Attitudes Posters (and heading)
  • 6 Global Contexts Posters (and heading)
  • 16 Key Concepts Posters (and heading)
  • 10 Learner Profile Posters (includes "risk takers" and "courageous" as well as "thinkers" and "global thinkers") (and heading)


Where necessary (regarding the spelling of "organise" and "behaviour" etc.) I have included two versions, one in American English and another in British English.

All of the poster sets are available individually in my TPT store. The total cost of all of them is $12. If you purchase this bumper kit, you can save $2.

This is a fantastic purchase for IB MYP teachers at back to school time!

Tuesday 23 May 2017

Tech Tip Tuesdays: Worthwhile purchase -a clicker

Welcome back to another Tech Tip Tuesday. Click here to view any of the other posts in this series. As always, if there are any technology tutorials that you'd like me to feature, be sure to comment below!

This week's post is a recommendation for a simple tool and how it can be used in your teaching.


This little thing has proven to be very useful over the years. I got it cheaply on Amazon and it has been worth every cent! Don't worry, this isn't going to be a post about clicking through a PowerPoint full of information text. Here are some practical ways to use it in the classroom.

Student presentations:
In my school, it's not uncommon to see children doing oral presentations making use of a Keynote/PowerPoint presentation. You'd be amazed to see the boost of confidence they get when the clicker is placed in their hands!

Teaching new vocabulary (great for ESL/other second language):
I absolutely love having my students play Kim's game (known to Irish teachers as Cluiche Kim) to teach new vocabulary in another language. It's very simple. Pick 5 new words and put their pictures on slide 1. Then copy and paste that slide several times. On slides 2, 4, 6, etc. delete one of the pictures (moving the position of the other pictures or deleting more than one picture at a time if you want to create an extra challenge). Simply use the clicker to make the board blank, have your students close their eyes and then click to the next slide. They then need to name which picture is missing. 

Student selection:
Many of these pointers have a laser on the top. Children LOVE using these! It could be used for phonics. Put a sentence / several words on the board and ask a child to use the pointer to show the "ch" sound. Similarly, it could be used to point at the photograph representing a new word in another language. They could use it to show where they found a word on a Boggle board (with letters or numbers - if you don't know what I'm on about, Google "Math Boggle"). 

Behaviour management aid:
If you happen to use PowerPoint/Keynote for any of the above ideas, this clicker allows you to use the classroom management strategy of proximity, ie. standing close to the children who are likely to misbehave (or have already begun misbehaving!). You can still play the games or go to the next slide of a text from any corner of your classroom. This gives you endless freedom to keep a close eye on those who need it!

Credits for Tech Tip Tuesday logo:
Keyboard lettering  licensed by Dancing Crayon Designs ©www.dancingcrayon.com 
Glittery clip art from Glitter Meets Glue Designs 

Clip art frame from My Cute Graphics

Friday 19 May 2017

IB Attitudes posters for MYP/older PYP students


There are lots of PYP resources online. However, it's more difficult to find IB attitude posters suitable for older PYP students or MYP teenagers. 

Hence I've created this set of IB attitude posters designed with tweens/teen students in mind. You can pick them up in my TPT store for just $2.50. 

There are lots of other IB resources in my store too so be sure to check out the IB section if you are a PYP or MYP teacher. 

Here's a preview of the full contents:


Tuesday 16 May 2017

Tech Tip Tuesdays: PowerPoint Tutorial for Beginners

New to making resources using PowerPoint? Here's a simple tutorial to get you started!

This post is part of my weekly Tech Tip Tuesdays series. If there are any other technology tutorials you would like to see, please be sure to comment below.

I've laid out every step in this tutorial to make it accessible even for people who do not feel very confident using Microsoft PowerPoint. Follow the steps to make your own teacher sign. It's very easy to adapt these skills to make other posters, classroom labels, worksheets, etc.


How to make a teacher sign - a PowerPoint tutorial for beginners.


1. Page setup:
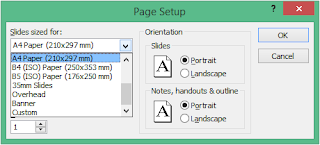
When I begin making any resource on PowerPoint, I always set the page size to A4 or A3 so I can picture how big it will be when I print it. To do this, click on the "Design" tab and then on "Page Setup." Select your chosen size in the dropdown menu and choose whether you want the slide portrait or landscape.

2. Choose a background. 
I got this one from TPT. You can always to a Google image search for any type of digital paper or background. Copy and paste this onto your slide. Then crop it (in the "Format" tab) to make a rectangle. I also added a thick black border by changing the colour and weight in the "Picture border" dropdown menu (still in the "Format" tab).

3. Make a frame.
For this one I did the simplest type of frame. You could also download a clip art frame and paste it in. For mine, I added in a rectangle from the "Shapes" menu in the "Insert" tab. I clicked on the "Format" tab and changed the "Shape fill" to white and "Shape border" to black. In order to have it perfectly centred in the coloured background, select both the background and the frame (CTRL and click on both), then go to the "Format" tab and in the dropdown "Align" menu, select "Align centre." Repeat this and select "Align middle" too.

4. Add the text.
Simply click on "Text box" in the "Insert" tab and draw it where you like. If you want to see how I install pretty fonts, check out last week's tutorial. Again, you might want to select both your text box and the frame in order to align your name how you wish.

5. Add an image.
There are tonnes of avatar creator websites to make a personalised version of you. I used the South Park Avatar Creator. I particularly liked this site because it allowed to me to add an iPad in my hands. Simply follow the instructions, download the image and paste it on to your slide.

And you're done! 

I hope you found this tutorial useful! Please let me know how you got on in the comments below!


Credits for Tech Tip Tuesday logo:
Keyboard lettering  licensed by Dancing Crayon Designs ©www.dancingcrayon.com 
Glittery clip art from Glitter Meets Glue Designs 

Clip art frame from My Cute Graphics

Saturday 13 May 2017

Get organised for the summer hols

The summer is so close, we can almost smell it! As you all know, May and June are particularly tiring months with report-writing, squeezing in the last curriculum objectives and dealing with the energetic behaviour that comes part and parcel of the approaching summer holidays. So why not get a headstart on organising your classroom so that you're not trying to deal with it in the last week of school when your energy is well and truly drained?

Here are my suggestions for 5 simple tasks. Set out some time to do these over the coming weeks, in whatever way suits your schedule and you'll thank yourself when the final week rolls round. You might need to break down these tasks into smaller parts. I, for one, could only face one desk drawer at a time!

1. Deal with your drawers!
I decided to start with this one because it was pretty messy. Though my cupboard is much more painful to look at, I couldn't face that as my first task for fear of being disheartened! I have that habit of just throwing anything and everything in my desk drawers. I picked up a cheap drawer organiser to help me out. I was inspired by one of my colleagues who used simple plastic containers to split her drawer into compartments. It looks so organised! I already feel so accomplished!


2. Declutter your desk!
Admittedly I keep my desk relatively neat and tidy. However I know a lot of you out there have desks that look like a bomb just hit it. So get on it, sort it out! If your problem is caused by lesson resources hanging around, go and invest in a set of 5 A4 drawers (mine is pictured below). This has made my life infinitely more organised. It's so easy to check if you have photocopied everything you need for the next day and it saves sifting through unnecessary piles of copies.


3. Attack the cupboards!
I know I'm not the only one who has a tidy classroom on the outside but a cupboard full of resources just dying to burst out at any moment. Every time I tidy it up, I vow to keep it in order and every year I end up creating an ungodly mess in there. If you can't see it, it doesn't exist, right?


4. Sort out THE PILE!
THE PILE deserves capital letters. We all have one. It's that pile of paperwork waiting to be filed, it's the laminated resources you want to keep but never put into folders, it's the random sheets on your desk that you thought might be useful but you didn't bother finding a home for them. 


5. Do a techy tidy!
This is one that can often be neglected. Many resources get saved under names that make them difficult to search for. Rename anything unrecognisable. Lots of files get thrown into a big folder with no real order. If you haven't already done so, have a folder for each subject area/year group and subfolders for each curriculum area/strand/unit/topic. Tidy up your desktop. Delete unnecessary files. Sort out your school email. Delete anything you don't thing you'll need in the future. Oh, and most importantly, BACK EVERYTHING UP!!!!


With all 5 of these tasks tackled, you'll feel like the summer is so much closer! 


Tuesday 9 May 2017

Tech Tip Tuesdays: Pretty Fonts

Welcome to a new series here at A Crucial Week - Tech Tip Tuesday. For the next few Tuesdays I'll be sharing some tips and tricks of how to use technology in your planning, preparation and teaching. If you have any particular requests for technology tutorials, please comment below!


Have you seen pretty fonts on resources shared online? Have you always wondered how to get these? Well, it's really easy to do. Here are the three steps you need to follow.


1. Get inspiration!
I suggest going to Pinterest and searching "favourite fonts classroom." There you'll find lots of ideas, written in the name of the font. Alternatively, you might want something that fits a theme so just Google, "Free Star Wars font" or "Free superhero font" etc. Or scroll down to see my favourites!


2. Download the font
I always get free fonts. Almost every font I use is from Kevin and Amanda's "Fonts for Peas" or "Free Scrapbook Fonts" collections.


3. Install the font
On a Mac: 
Go to your "downloads" folder. Double click on the font and it tells you what to do!
On a PC:
1. Go to your "downloads" folder. If the font is in a zipped folder, extract the files. Double click on the font and then click "install".
*If that doesn't work - try the following:
2. Open the control panel (Start menu --> "Control panel" or click on the folder icon on the toolbar at the bottom of the screen, click the arrow in the address bar and select "Control Panel).
3. In the control panel, use the search box to search "font"
4. Click "Fonts"
5. Drag the extracted font file (probably a ".ttf" file) into the "Fonts" folder.
NOTE: If you have any programs in which you use different fonts open, close them and reopen them to view the new fonts.

Here are my current favourites! (Just Google their names followed by "font" if you would like to download them for free.)


Credits for Tech Tip Tuesday logo:
Keyboard lettering  licensed by Dancing Crayon Designs ©www.dancingcrayon.com 
Glittery clip art from Glitter Meets Glue Designs 
Clip art frame from My Cute Graphics

Monday 1 May 2017

You know you've got a teacher problem when...

... you can't stand the sight of this box of plastic gloves...


...so you do this...


...but then you think that's still not good enough, so you do this:


Please send professional help!